Create lists: Creating review file
Go to Create Lists from the Function drop down menu.

Pick an empty review file, or change All to Empty. Click the arrow next to Max Records to display the available review files in order by size. Pick a review files that will work for the search. Highlight the review file by clicking on it. Click Search Records.

This will bring up the Boolean Search box. Label the Review File Name to include the two or three identifying letters of your library. The rest of the file name should match the search term.

The Store Record Type will default to BIBLIOGRAPHIC b. Click on the dropdown menu next to BIBLIOGRAPIC b to change the type of review file. The choices are ORDER o, CHECKIN c, CHECKIN AND CARD cc, AUTHORITY a, ITEM i, PATRON p, COURSE r, INVOICE n. Pick the type of review file for your search. The information that follows will only relate to that Store Record Type.

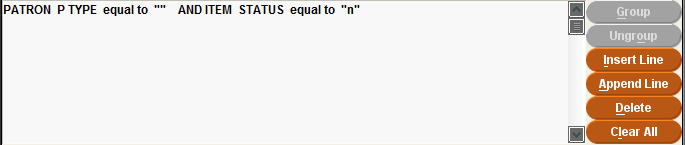
In this example, we are going to use PATRON p. The review file will be patrons with billed books.
Double click in the box under Type. This will bring up the Select Me box. Either click on PATRON or type p. Click OK.


Double click in the box under Field. This will bring up the Select Me box again. Click 47 P TYPE. Click OK.


Double click in the box under Condition.

This will bring up the Select Me box again. Depending on what Ptype(s) are included in the review file, will depend on which search term to use such as = equal to, or w between.

Equal To
The equal to search allows for only one Ptype in the search. Enter the Ptype number in Value A.

Between
The between search allows for multiple Ptypes. Enter the Ptypes in Value A & Value B. The ptypes will be Value A – Value B. Example, if Value A was 25 & Value B was 29 this will also include 26, 27 & 28.

Click Append Line to add a new line at the bottom. Insert Line will put a line at the top.

In this example, we are looking for patrons with one Ptype and an item with the status of n which is Billed. Note: repeat the steps for Type, Field, Condition and Value to add the search terms for ITEM, STATUS, equal to, and n.

The search terms will appear in the middle of the Boolean Search box.
Once you are finished entering your search terms, click Search.

To find the review file, you might need to change Empty to Complete in the dropdown menu. Finding the review file can be done by File, Name, Login or Created [date/time]. Highlight the review file to view it.


Once the review file has been highlighted, viewing the review file records can be done several ways.
1) Click on Show Records. Or 2) Double click on the review file.

The Show Info button shows the search terms used for the review file.

A review file can be sent by email or exported by using Excel. The List Records will let you email the file to yourself or someone else. The Export Records will allow you to export the file to Excel. You can also sort your review file using Sort Records.

Sort Records, List Records and Export Records
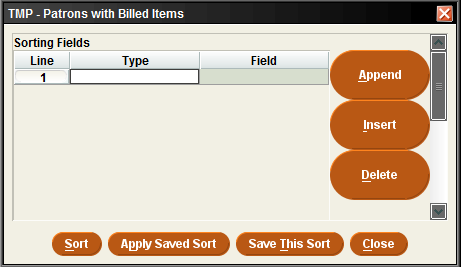
The Sort Records button will allow the viewing of the review file records by different fields of information. For example, a sort can be done alphabetically by patron names. Click Sort Records.

This will bring up the Sorting Fields box. Click on Type and Field to see the options for sorting the review file.
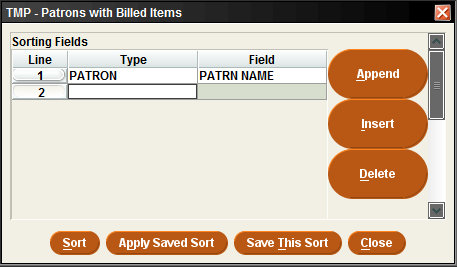
Picking the Type and Field will display any items related to that type or field.

Add more sorting fields by clicking on Append or Insert. Append will put the line at the bottom. Insert will put a line at the top. Tip: Insert will also allow a line anywhere in the sorting fields once there are 3 or more lines. Click Sort.
The List Records button will email the review file to any email address. Click List Records.
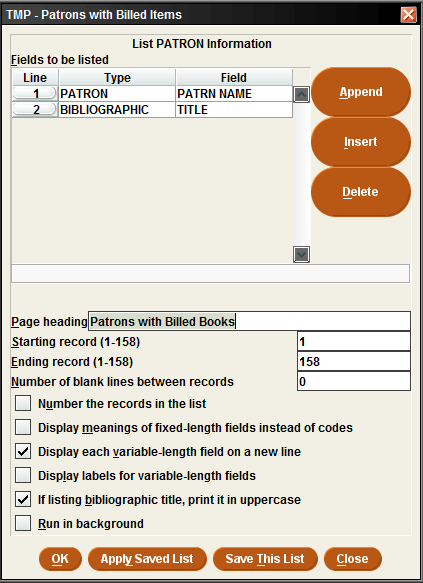
Once List Records is clicked, the pop-up box to List PATRON information will appear. Put in the fields to be listed and the Page heading for the email (see example on the next page).
How to fill out the List Information Box:
This will bring up the Select Standard Printer pop-up box. Click on E-mail Printer. Click OK.

Tip: if the option for E-mail Printer does not appear, it might need to be set up. Click on File, Select Printer and Standard Printer. This will bring up the Select Standard Printer and Question pop-up box. Enter the email address and click OK.

The Export Records button will allow exporting of a review file to Excel. See Creats Lists – Exporting a Review File to Excel.
