How to set up or troubleshoot your VPN connection.
This is for members with IT Services support and Marmot Meraki Firewalls at your location.
| Info |
|---|
Meraki VPN MX documentationClient VPN OS Configuration - Cisco Meraki |
...
| Anchor | ||||
|---|---|---|---|---|
|
...
Click on the + to “Add a VPN connection”
Make your settings match these. Marmot will provide you with the “Server name or address”, “Pre-shared key”, “User name” and “Password”
...
The settings are:
VPN Provider - “Windows (built-in)”
Connection Name - “Work VPN”
VPN type - “L2TP/IPsec with pre-shared key”
Type of sign-in info - “User name and password”
Click Save
...
Click “Change adapter options”
Right-click on the “Work VPN” click “Properties”
Click on the “Security” tab, click “Allow these protocols” check the box “Unencrypted password (PAP)”
...
Click ok three times to close all the VPN connection windows.
To connect you must be off-site (not at the library that you are trying to VPN into). Bottom right by the system clock click on the network icon it will bring up your network connections and there will be the “Work VPN” click on the “Work VPN”
...
Click “Connect”
...
Windows 11 VPN setup
Type: VPN in the search field on the taskbar
Click on “VPN Settings”
Click on the Add VPN button
...
Make your settings match these. Marmot will provide you with the “Server name or address”, “Pre-shared key”, “User name” and “Password”
VPN Provider - “Windows (built-in)”
Connection Name - “Work VPN”
VPN type - “L2TP/IPsec with pre-shared key”
Type of sign-in info - “User name and password”
Click Save
Click on the down arrow next to the Connect button
...
Click on the Advance options button
...
Click on the Edit button next to More VPN properties
...
Click on the “Security” tab, click “Allow these protocols” check the box “Unencrypted password (PAP)”
...
Click on the“Networking” tab, click on the words for “InternetProtocol Version4(TCP/IPv4), then click the“Properties” button.
...
Click “Advanced…”
...
Uncheck “Use default gateway on remote network”
| Note |
|---|
This setting is used to enable a split tunnel. |
...
Click the “DNS” Tab, check the box labeled “Register the connection’s address in DNS”
...
Click ok three times to close all the VPN connection windows.
To connect you must be off-site (not at the library that you are trying to VPN into). Bottom right by the system clock click on the network icon it will bring up your network connections.
Click on VPN
...
Then click on Work VPN
...
Then click on the Connect button, which will appear below Work VPN.
Windows Map Network Drive
...
| Info |
|---|
Normally with the Windows login name is firstinitialLastname so John Doe is jdoe and use the password you use to log into the Windows workstation |
...
Click OK
You are
...
connected
Windows Remote Desktop (RDP) to a Windows PC
...
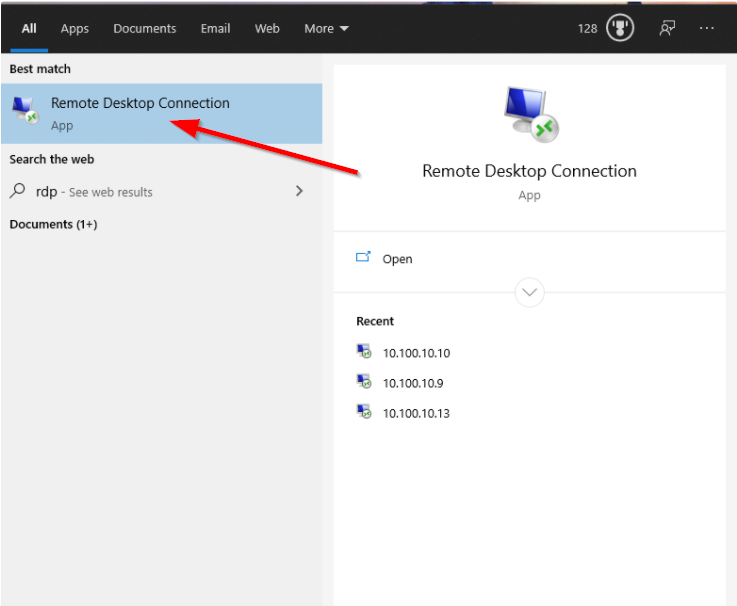
Click Windows key type: "RDP"
Click Click on the "Remote Desktop Connection"

Once the program opens click “Show Options”
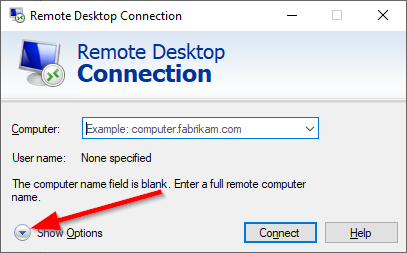
Enter your computer name in the “Computer” field
The computer name will be like "ABC-9999.marmot.shared" Note you have to append the .marmot.shared to the end.
| Note |
|---|
Note you will have to append the ".marmot.shared" to the end. |
...
Open “System Preferences” and click on “Network”

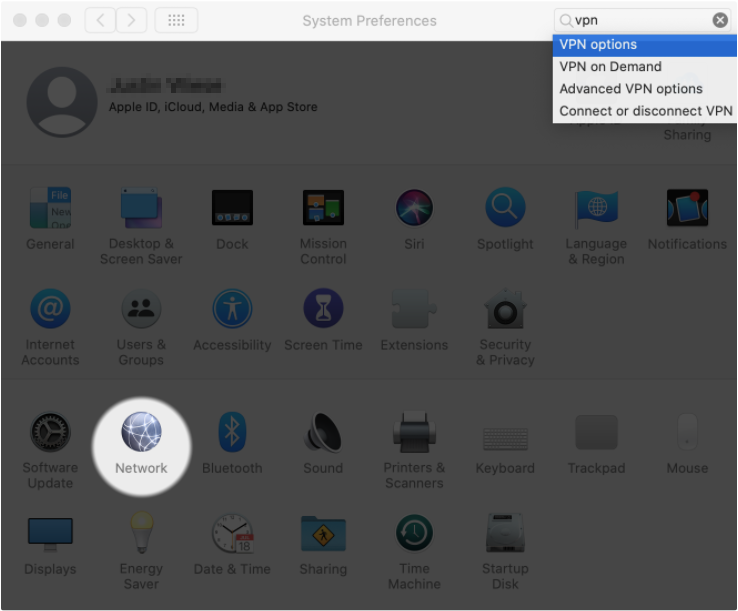
Click on the bottom left “+”
The Interface: is “VPN”, VPN Type is “L2TP of IPSec” Service Name: “Marmot VPN”. Click “Create”
Marmot will provide you the “Server Address” and the “Account Name”
Enter the provided “Password”, and “Shared Secret”
| Info |
|---|
Also know as a pre-share key or PSK |
click Click “OK”
Make sure the box is ticked for “Show VPN status in the menu bar Click “Advanced…”
Check the box “Send all traffic over the VPN connection” click “OK”
Click “Apply”
Click on the VPN icon, click on “Connect Marmot VPN”
Same menu to disconnect
Mac OS Map Network Drive
How to access a network drive from the VPN.
To map the server drives you open finder then press command+k
It will give you this window. Enter your server-name.marmot.shared after the smb://
...
Click Connect
...
Enter your Windows/Domain login credentials, click “Connect”.
...
...
Select the share you want to map, and click “OK”
...
...
You are now connected
...
Mac OS Remote Desktop (RDP) to a Windows PC
After you have the VPN set up and connected you will need to configure the RDP software. You will always have to have the VPN connected first before using the RDP.
You will need to download the Microsoft RDP tool from the app store
https://apps.apple.com/us/app/microsoft-remote-desktop-10/id1295203466?mt=12
...
Make sure you write down your work desktop number, it will be something like ABC-9999 where the last four numbers are unique to your workstation, the first three letters are your district code.
Open the app
Click the "+" icon and click "add pc"
the The hostname will be "ABC-999.marmot.shared" or whatever your number is.
...
For the "User account" click the drop-down menu and select "Add a User account.
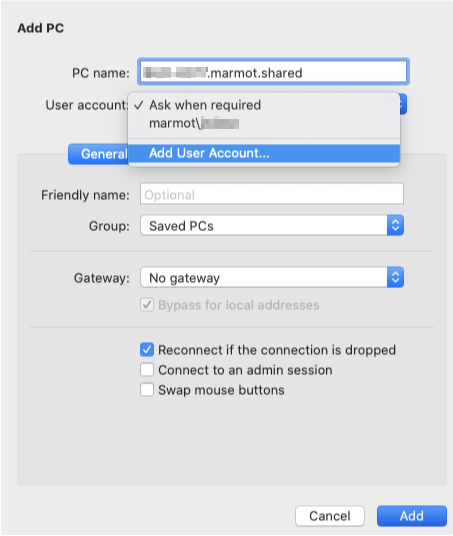
Your "Username" will be "marmot\yourWindowsLoginName" enter your Windows password then click add
| Info |
|---|
Normally with the Windows login name is firstinitialLastname so John Doe is jdoe |
click Click the add button
double Double click on the newly created PC, it will display a cert box, click "Continue"
You will now be remoted into your office computer.
Chrome OS
If you haven't already, sign in to your Chromebook.
Click the status area at the bottom of your screen, where your account picture is located.
Select Settings.
In the "Internet connection" section, click Add connection.
Select Add private network.
In the box that appears, fill in the information below:
Server hostname: Enter the hostname (e.g. .com)orthe active WAN IP (e.g. XXX.XXX.XXX). Hostname is encouraged instead of active WAN IP because it is more reliable in cases of WAN failover. Admin can find them in Dashboard, under Security appliance > Monitor > Appliance status.
Service name: This can be anything you want to name this connection, for example, "Work VPN."
Provider type: Select L2TP/IPsec + Pre-shared key.
Pre-shared key: Enter shared secret that admin created in Security appliance >Configure > Client VPN settings.
Username credentials for connecting to VPN. If using Meraki authentication, this will be an e-mail address.
Password credentials for connecting to VPN.
Click Connect.
Android
To configure an Android device to connect to the client VPN, follow these steps:
...
Open Device Manager (right-click on the Windows start icon)
Find Network Adapters in the list
Uninstall WAN Miniport (IP), WAN Miniport(IPv6) and WAN Miniport (PPTP). 4. Click Action > Scan for hardware changes.
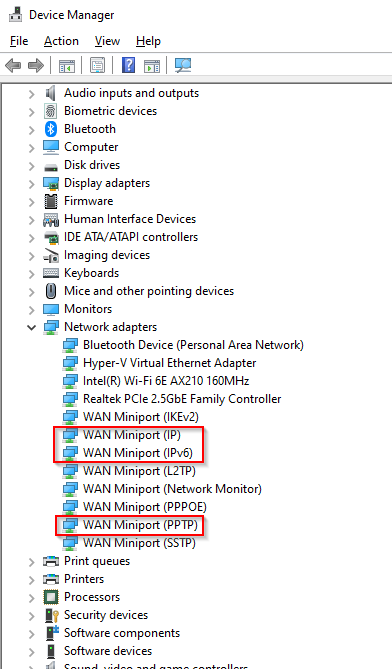
The adapters you just uninstalled should come back.
Try connecting again.
Related Documentation
...