This documentation discusses how to create, edit, curate, and use User Lists in the library catalog
| Anchor | ||||
|---|---|---|---|---|
|
| Table of Contents |
|---|
What are User Lists?
The library catalog features a User Lists function in your library account that you can use to manage and curate lists of titles from the library. User lists can be kept private for personal use or you can make your user lists publicly available with easy sharing options. Users lists in the catalog feature a number of different options so you can view, edit, and curate the lists to best meet your needs.
List Functions
My Lists Basics
There are several different ways to create a list using your library’s catalog. You can create a list from the My Lists option in the My Account section once you login to the catalog. You can also use the Add To List button for any title in the catalog or to create a list of titles on specific topics. You can click on any title and find the Add To List button within the record.
Log in to your library’s catalog. Located Under My Account is the link for My Lists.
Under the My Lists heading is the Create a New List button.
Once you click on the Create a New List button, the Create new List box will appear. Fill in the List name. The Description is optional. All lists are private when first created. You can use the Access toggle to change a list from Private to Public. Click on the Create List button.
You will receive a message that the list has been created successfully. Click on the View My List button to see this newly created list.
Since you have not added any titles to this list, you will see the information that “you do not have any saved resources” displaying on your list. There are several different ways to add titles to your lists. You can click on the Add Multiple Titles button in the list options or you can search the catalog for titles and use the Add To List button or the Bookbag.
Adding titles to your List
Add To List button
Search for the title you would like to add to your list.
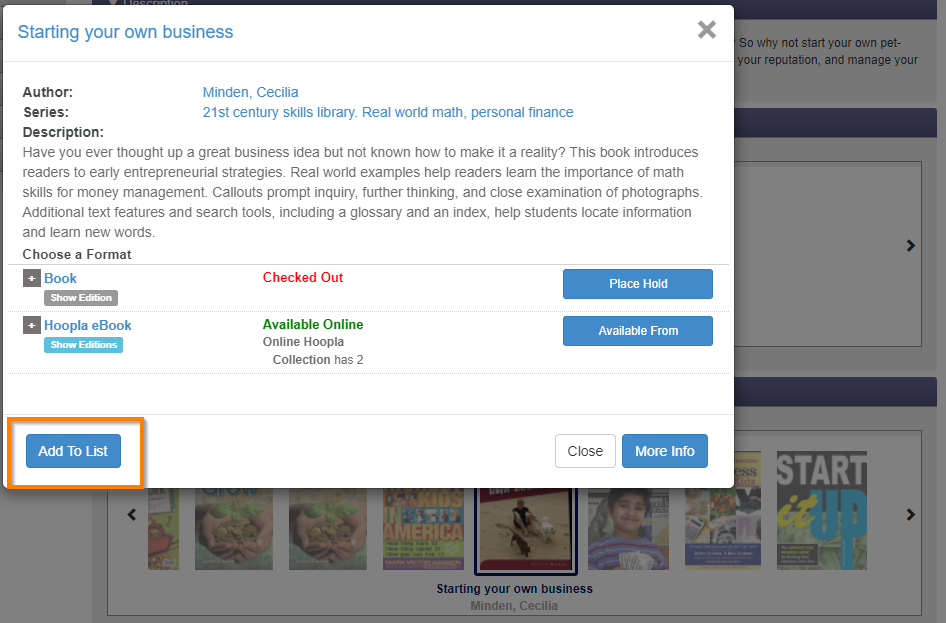
Click on the Add To List button located under the title description.
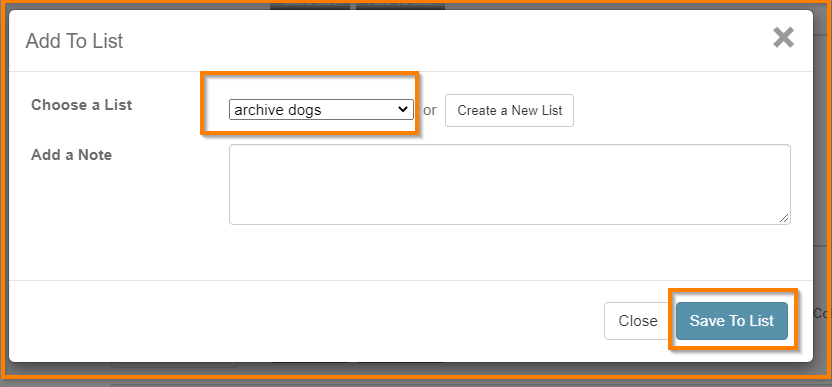
If you are not logged in to your account, you will be prompted to login. If you are already logged in, you will see the Add to List box. If you have more than one list, you will see all your list choices. If you only have one list, you will only see that list. Pick the list from the Choose a List drop-down. Click the Save To List button. The selected title will be added to that list.
The Add a Note field will add information you’ve entered to the title, which only displays on your list.
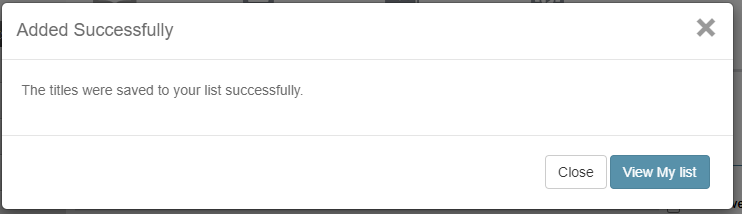
You will get the Added Successfully pop-up letting you know the title was saved to your list. Click on the View My List to see the newly added title in the list page, or click on the Close button to add more titles to your list.
When you try to add an item that is already in the chosen list, you will get a message letting you know the title is already in your list. You can click on the Close button, or Create a New List. If you click on the Save to List button instead of creating a new list, the item will be put in a default My Favorites list.
Add titles or create a new List from a search for specific topics
One way to create a list is to start with a search for a specific topic. In this example, we are using a pet sitting business. A list could be created searching for specific titles as well.
The search should bring up a list of titles relevant to the search string. The number of available items will be listed in the upper left corner. Add a title to a list by clicking the Add To List button. If you have not created the list before pressing the Add To List button, you will be prompted to login and create a new List.
If you have not created a list before pressing the Add To List button, the Add To List box will appear. Click the Create a New List button.
You will be prompted to fill out the Create new List box. Fill in the List name. The Description is optional. All lists are private when first created. You can use the Access toggle to change a list from Private to Public. Click on the Create List button.
Clicking on a title
Add an item to the list is to from the detail record view. To view the detail record, click on the title of the item.
This will bring up the full record display with the Add To List button to add the item to the list.
Another way to add an item to the list would be to click on the title from the More Like This section. Scroll to see the other titles that might be relevant to the list. Click on the item cover to bring up the title information and use the Add to List button to add it to your list.
Adding titles using Bookbag from search results
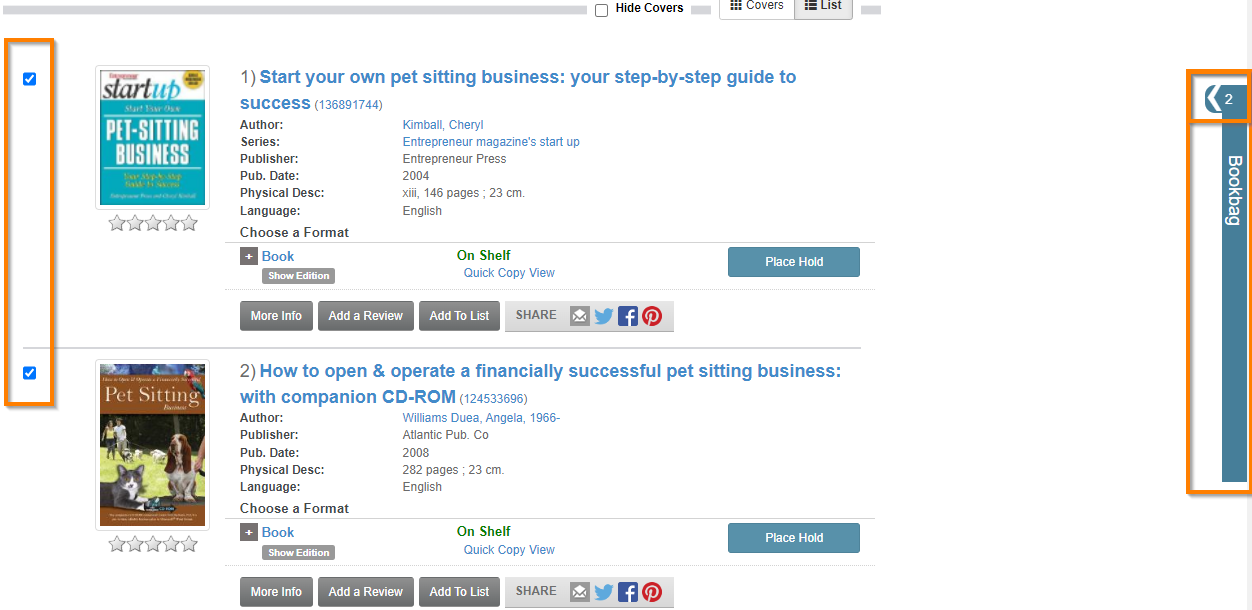
You can add multiple titles to your user list from the search results page using the Bookbag option.
After you execute a search for your desired topic, you will see clickable checkboxes next to titles. You must select at least one title with the checkbox to open the Bookbag. The number in the Bookbag will update as you select and deselect titles with the checkboxes.
Click on the arrow next to the number in the Bookbag on the right hand side of your screen to open/expand the Bookbag.
When the Bookbag is expanded you can delete previously added titles with the red x next to the titles listed. Use the arrow at the top collapse the Bookbag and continue adding titles.
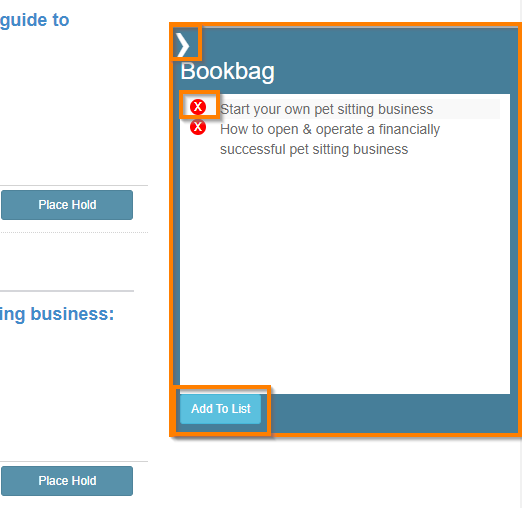
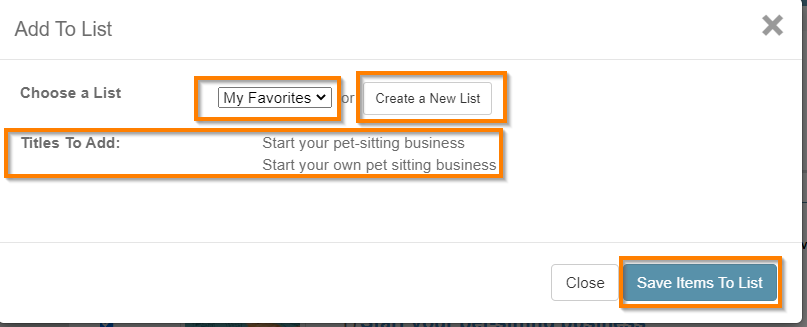
Use the Add to List button to bring up the add to list options from the Bookbag. When you click Add to List from the Bookbag you can add the selected titles to an existing user list or you can create a new list. The pop-up will list the titles you’ve chosen to add to a list.
If adding titles to an existing list, click on the Save Items to List button. If creating a new list from the Bookbag, title your list accordingly and click the Create List button.

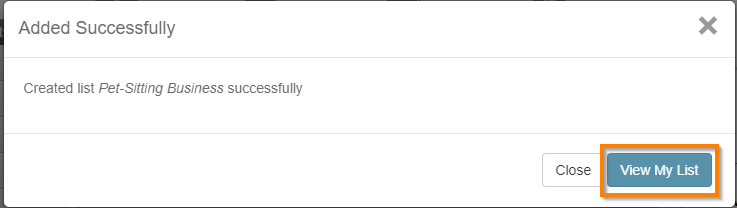
If you are adding titles from the Bookbag to an existing list, you’ll see a message when the titles were successfully added to your existing list. If you created a new list from the Bookbag, you’ll see a message that your new list was created successfully. You can view the recently added items with the View My List button in either scenario.
Adding Archive Collections and Objects
If your library has access to the Marmot Digital Archive, you can include Archive Objects in your user lists.
Search the digital archive by changing the search source to Local Digital Archive and searching for a name, subject, or term.

When you find the result you would like to add to your list, click on the Add to List button.

You will return a pop-up window. Choose the list you would like to add your archive object to (or create a new list) and click on the Save to List button.
When your archive object is added successfully, you will return a success message.

| Anchor | ||||
|---|---|---|---|---|
|
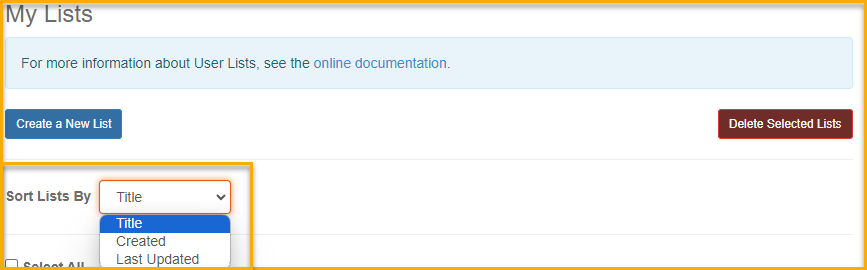
You can view any of your lists by logging into your library’s catalog. Once logged in, you will see the My Account tab. On the My Account tab is the My Lists link. Click on this link to see all your lists.
You can view all your available lists . You can see how many Items are in each list. You can also see if the list is Public or Private. You can also see our Default Sort choice.

the My Lists page. You can sort your My Lists page by Title, Created date, or Last Updated date.
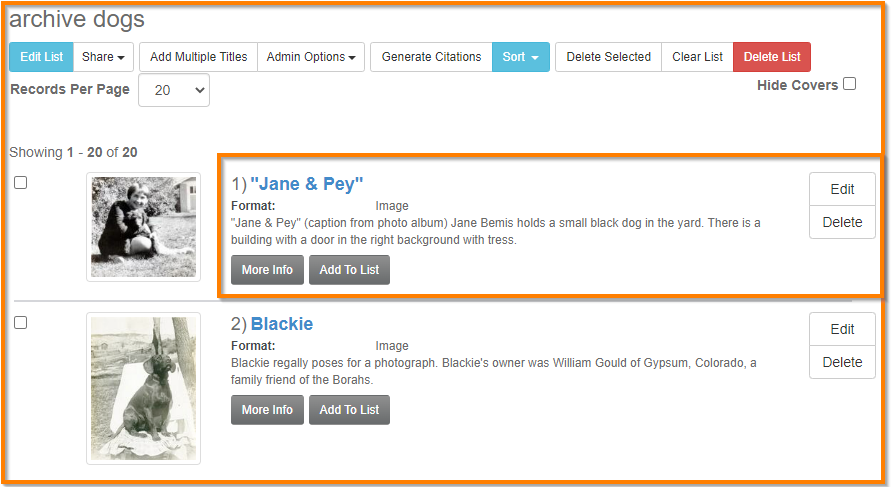
Under a list’s title you’ll see the following information:
Number of items in the list
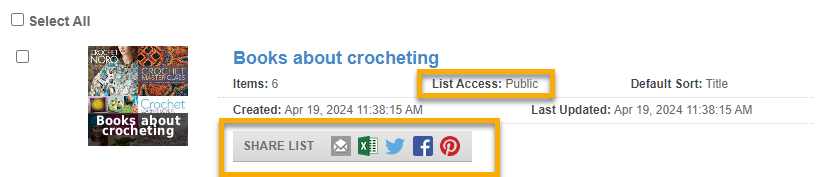
List access (Private or Public)
Default sort
Creation date and timestamp
Last updated date and timestamp
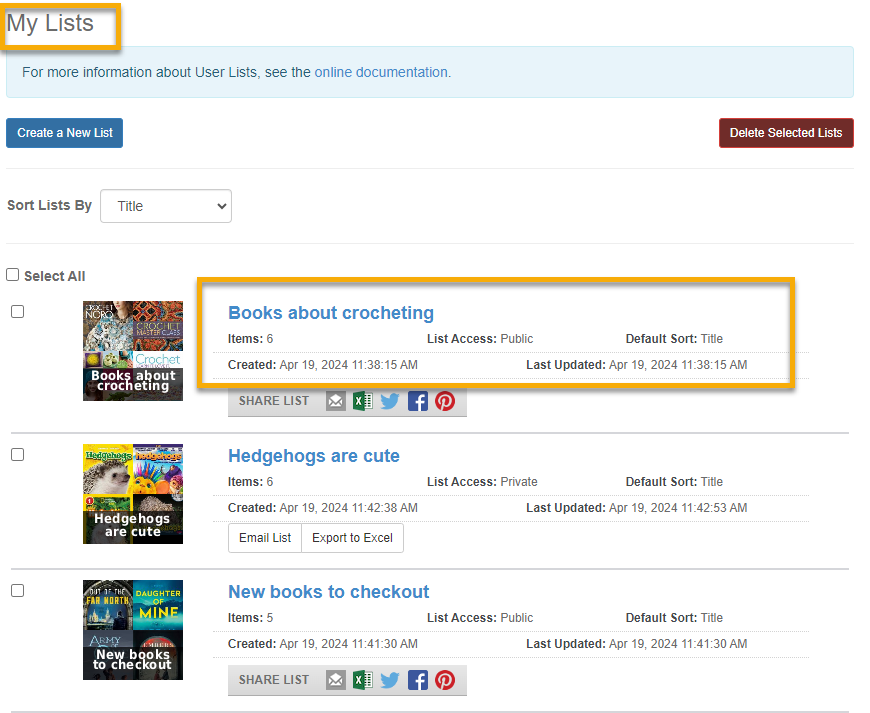
Public lists will have the Share List options to email, export, and share to social media sites.
Private lists will give you access have options to Email or Export the list.

| Anchor | ||||
|---|---|---|---|---|
|
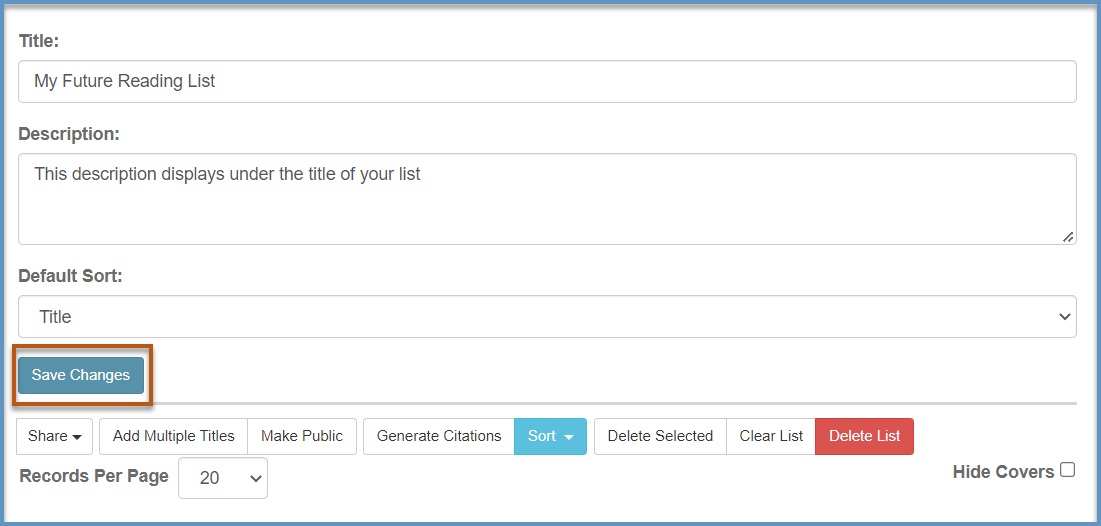
You can edit the actual name and description for a list. First, login in to your library’s catalog. Click on the My Lists under the My Account.
Click on the title of the list to access the individual list’s options. Click on the Edit List button.
You can change the Title, Description, and Default Sort.
| Info |
|---|
The Default Sort is controlled by the owner of the list. |

Once you made the changes, click on the Save Changes button.
The User Defined Order allows you to drag and drop titles in the order that works best for you.
You can also edit the note associated with an item. Click on the Edit button for any item in your list.
You can add information in the Notes section.
The note will now appear in the Notes field on the item. This note will only be seen while looking at the list.
| Anchor | ||||
|---|---|---|---|---|
|
The Share button will give you the option to email list, print list, copy list, export to Excel, or share on Social Media sites.
Although it is not required, you can always check the Hide Covers box before printing to show more titles per printed page.
Sending a list through email is as easy as adding email addresses and clicking the Send E-Mail button.
The Export to Excel button allows you to export all the titles from the list to an Excel spreadsheet. Exporting a list to Excel will show the title of the list, the description (when filled out), the title of the item, the author, any notes, the material type, and the date it was added.
| Anchor | ||||
|---|---|---|---|---|
|
Click the Add Multiple Titles button.
This will bring up the Add titles to list box. A group of items can be added by title, ISBN, barcodes, Archive PIDs, Grouped Work Ids, or Bid Ids. Each entry should be on its own line. Click the Add To List button. The matching items will be added to the list.
If you are adding multiple titles by title, the system executes a search for the entered title and will add the first result for that title search to the list.
You can return more accurate results if you add the author’s name after the title using AND. For example, you could type carnival AND sedaris as your search phrase to add David Sedaris' title A carnival of snackery to your list.
| Anchor | ||||
|---|---|---|---|---|
|
If your list is private, you will need to click on the Make Public button.
Once you change a list from private to public, the button will change to Admin Options with a drop-down for the Make Private button.
| Anchor | ||||
|---|---|---|---|---|
|
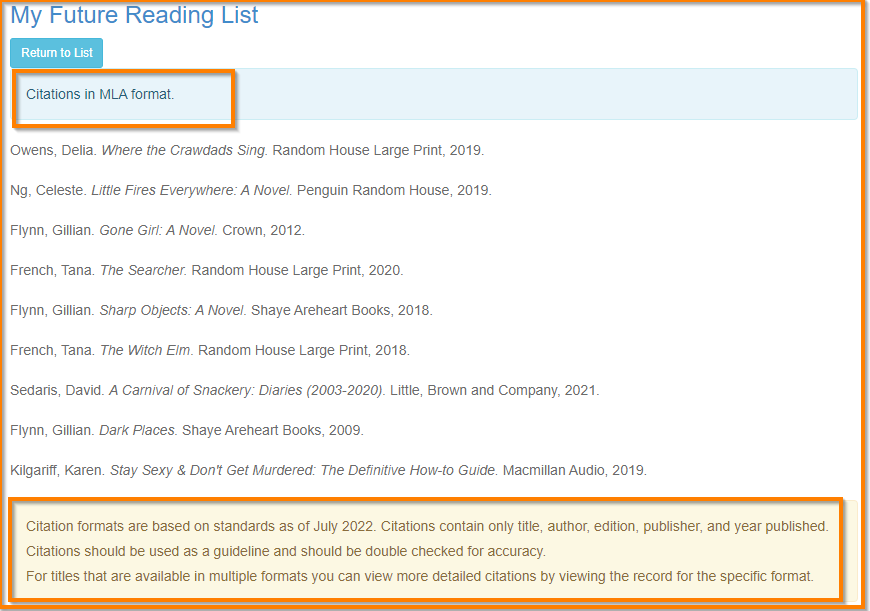
The Generate Citation button will display the choices available to generate citations.
Once you choose the citation format, click the Generate Citations button.
The citation format will be listed as well as a paragraph explaining more about the citations.
| Anchor | ||||
|---|---|---|---|---|
|
Sort has a drop-down menu to change the order of items on the list. You can change the sort to: Author, Date Added to List, Recently Added to List, User Defined Order. The default sort option is Title, where the list entries are listed alphabetically by title.
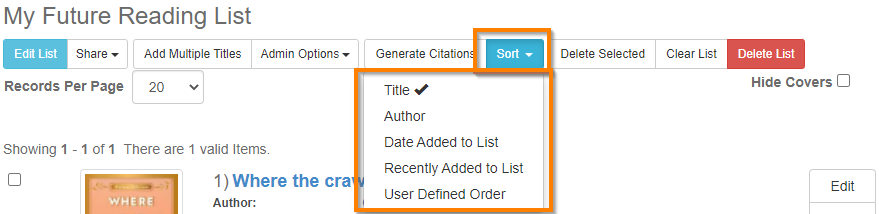
User Defined Order will let you Drag-and-Drop any of the items on the list to put them in any order.
List ID
The List IDis found in the URL of the list when viewing an individual list. The ID is the value found after the MyList portion of the URL.
For example a list with the URL https://opac2.marmot.org/MyAccount/MyList/56886 means the List ID is 56886

| Anchor | ||||
|---|---|---|---|---|
|
When viewing a list, you can apply apply available filters to narrow the results. For example you can narrow your list by format or availability.
Use the filters on the left hand side to narrow your list by aspects like format, genre, subject, or library branch. Use the filters above the list to narrow by availability.
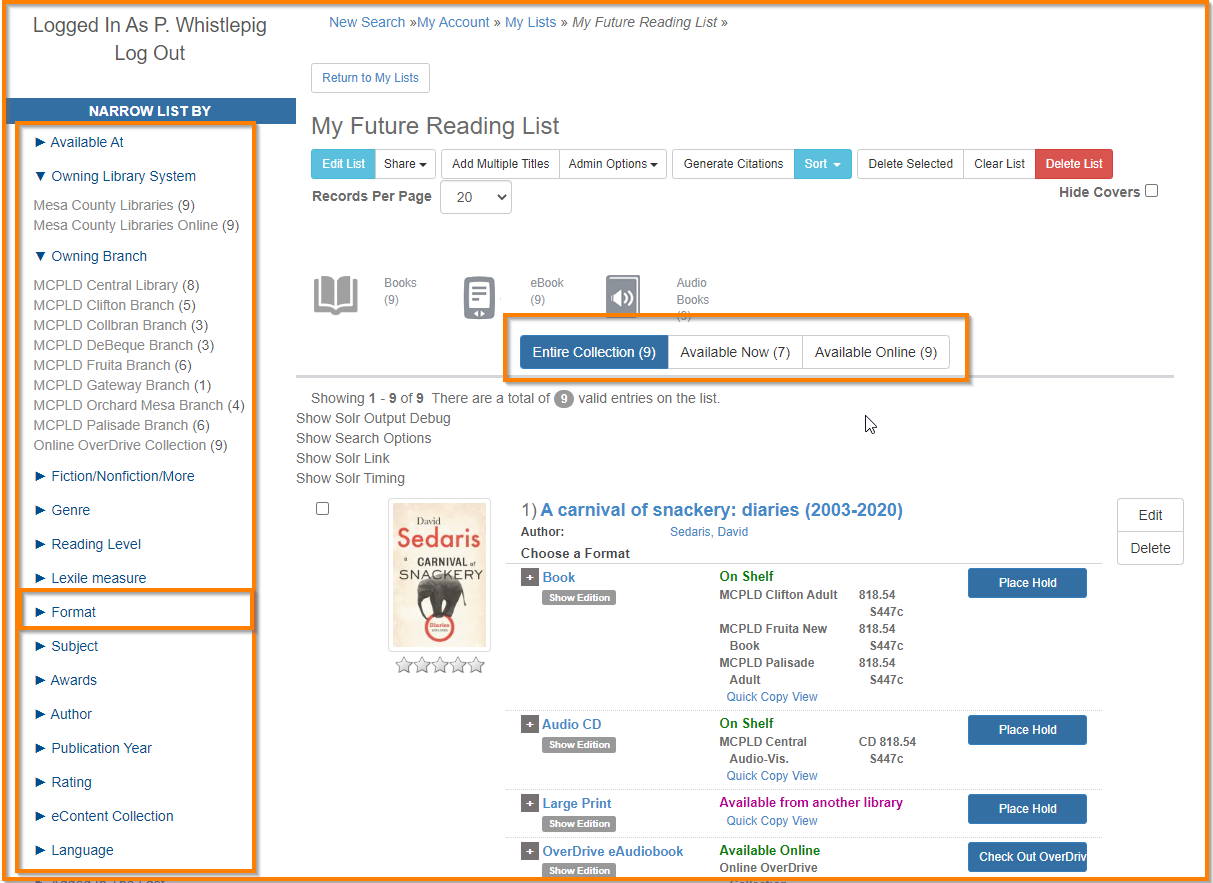
When you click on a filter, your list will par down based on the filter you applied. Filters used from the left hand side will display in the Applied Filters section on the left. If you apply an availability filter, it will be highlighted above the list.

To remove an applied filter, click on the red x icon next to the applied filter. To change the availability filter above, click on a different option.
| Note |
|---|
If your list is a mix of titles from the library and objects from the archive, filters will not be available. The catalog and the archive reference different systems that don’t share the same filters, so we cannot provide filtering options for mixed lists. |
| Anchor | ||||
|---|---|---|---|---|
|
The Delete Selected button is used to delete individual items from an existing list.
You can click on the box next to the item or items you want to be deleted, and click the Delete Selected button. You can also delete individual items using the delete button next to that item.
| Anchor | ||||
|---|---|---|---|---|
|
The Clear List button will remove all the titles on your list.
You will get a pop-up box with a warning that deleting the titles from your list cannot be undone. Click OK to clear the list of titles. Click Cancel not clear the list of titles.
Once the titles have been removed from your list, you can now use the list to add other titles.
| Anchor | ||||
|---|---|---|---|---|
|
You can check the box next to any list you would like to delete. You can delete multiple lists at the same time from the My Lists page. Click the Delete Selected Lists button.
You will get the Confirm? pop box message that will show how many lists will be deleted. This deletion cannot be undone. Click the Okay button to delete the list.
The list will be gone. You will only see any of your current lists.
If you click on the list you You can also see use the Delete List button that can be used from the list options in an individual list to delete an empty list or a list that has titles.
A pop-up box with a message asking if you want to delete this list will appear. Click OK to delete the list.
If you have no current lists, you will see the My Lists page with the Create a New List button.
Related Documentation
| Page Properties | ||||||
|---|---|---|---|---|---|---|
|